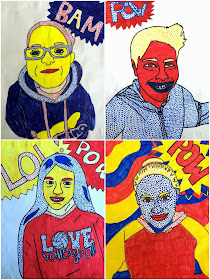
6th Graders did a really nice job on this project. We started off by learning a lot about the artist Roy Lichtenstein. We watched this video and read through this handout. Using iPads and computers students worked on editing their photo to make it in a comic book style. They drew from the image they created. I had to stress to them to draw what they were seeing and not what they thought it should look like. After seeing Lichtenstein's work, students set to work using only primary color markers (and black). They were to fill in some areas solid, and use Lichtenstein's dots in other areas.
I had two very different types of students with this project; one group were the students who totally embraced the idea of using interesting colors on their face, and the other who were so self conscious about it they would work with their drawing on their lap so no one could see it.
Even in this day in age, you know of the "selfie," many students were just so embarrassed to do this project. It was not because of the colors, but the idea of the self portrait.
Do any of you struggle with your older students at the idea of a self portrait? How do you go about problem solving it?


Wow these turned out awesome! My sixth graders get really nervous at the idea of a self portrait, we do a grid one. The first two days are a struggle, but after they get it they LOVE it!
ReplyDeleteThanks for sharing - that is awesome! Did you create that handout?
ReplyDeleteThese are great. I did self-portraits last year with my 5th grade with colored pencil, but didn't use photo's - these are really expressive. They did a really good job on their drawings - my students had a lot of difficulty drawing noses - any suggestions? Also, thanks for sharing that video and handout - great info - did you create that handout?
ReplyDeleteI find with self portraits the nose is often the most difficult past. For some reason students always want to close the shape of the nose instead of leaving it open, which in turn almost always looks like a triangle. When doing self portrait projects I really like to have students to have a printed out photo so they can first create the contour outline by drawing directly on the photo. I've found that this step tends to simplify the process a little bit when students go to draw their final draft. I cannot be credited for the handout, I pulled information from a few different places via google I suppose. I took information from several different place sand compiled it to be more age appropriate. I have used the format as a way to create new handouts about other artists!
DeleteThanks so much for this fabulous project! The fifth and sixth graders loved it!
ReplyDeleteI'm happy to hear that!
DeleteI love this! I am going to try it with my 7th and 8th graders this week. What app did your students use?
ReplyDeleteWe used the photoshop app to create the comic book outlines!
DeleteHi! which app?
DeleteHi! Which app did you use and did they copy from there onto paper?
DeleteThanks :)
We used the photoshop app!
DeleteFor those of you that altered the photos on an iPad, do you have a class set? I can't imagine how to do the technology part with the limited resources I have, but really want to do this project! Thanks!
ReplyDeleteI did have a class that was 1:1 iPads so that certainly helped. Another solution is to simply take the photos and have the students trace over their portraits using a sharpie and a transparency! That will give you some of the same effects!
DeleteEnjoy this. I think I'm going to give it a try.
ReplyDeleteThis is great. Thank you for sharing. My question is did you allow the students to trace the picture to paper after editing it ?
ReplyDeleteSince they already drew it digitally, yes I did allow them to trace the lines.
DeleteAs a student, I find this interesting in many ways! Very creative.
ReplyDelete