Showing posts with label 5th Grade. Show all posts

Friday, November 6, 2015

My World in a Bulb

This is one of those lessons that I just didn't get around to posting.  These may or may not have been completed by my 5th graders in May---BUT they're too good not to share.

In this lesson we looked at the art style of surrealism.  Of course we looked at the work of Magritte and Dali.  If your school has a BrainPop subscription, they have an awesome presentation for both elementary and middle school students. 

This lesson was quite simple, yet it really got the students to think.  I ran across this image online that inspired these surrealist bulbs!


  I also gave the students a couple handouts to get their ideas a-brewing.  The target here was to create a surrealist type world, event, or scenario inside their lightbulb.

This lesson cut it pretty close to the end of the school year so most students chose to fill in their background with a little watercolor and salt technique--definitely can't go wrong there!  


Saturday, October 17, 2015

Tie Dye Until I Die: Classroom Edition

By now if you're a regular visitor, it's no surprise that I'm a lover of tie dye.  My classroom decor reflects this passion, my tie dye inspired clothing serves as my walking advertisement, and my students CONSTANTLY beg to do it with me.  Until recently, I never pulled the trigger on it.  I used to be a Summer Camp Counselor at an all girls overnight camp (shout out to you RPC 4 G's) and I once tie dyed with over a dozen 9 year olds because they paid me in pine cones--I wish I was kidding.  Never have I ever had so many tie dye nightmares.  But fear not it's been about 6 years in the making and I've finally mastered the art of tie dying with my students.  In fact, I'm going to share with you how successful tie dying with 60 4th and 5th graders was for me.


Step 1: T-Shirts.
I thought this was going to be the most difficult part--having everyone bring in a t-shirt.  To my surprise this was not difficult at all.  The best thing about tie dye is that you don't need a new white t-shirt to do the trick, it can even be an old sports camp shirt with screen printing,  just make sure it's 100% cotton.  You'll always have those parents that send in packs of shirts for those students that forget.


Step 2: How to Tie the Shirts
Keep it simple.  For most of your kids they've probably never "properly" tie dyed before.  When I say properly they probably just took a whole bunch of rubber bands and tied it up randomly.  To guarantee a successful product I show students two very simple patterns to create:  Your traditional swirl and an accordion style fold.

Step 3: How the heck am I supposed to do this in my classroom?
Fear not.  It's possible, fun, and easy.  Break it down into steps.  I had students tie their shirts a day or two before we actually dyed them.  This is how we did it.  After showing them how to tie the shirt they brought their t-shirt (with name written with sharpie on the collar) and dunked it in the sink full of water (shirts are easier to tie if they are wet), we squeezed it out, and students practiced and secured their design with rubber bands.  To keep the shirt wet, I immediately had students put the shirt in a ziplock bag with their name on the outside.  


Step 4: The Dye
This step is so easy--BUT you must have students thinking about color theory so they don't get a muddy mess.  For first timers, I suggest limiting students to choose only 2-3 colors.  2 might even work the best so they can just coat the shirt 1/2 and 1/2.  After I showed them how to apply die, we went outside with dye, soda ash, and old file folder racks.  I have students remove their shoes (just in case), and we go.  Normally, you'd want to soak the shirt for 15 minutes in soda ash to fix the colors, but for this go around we just dunked them right before we dyed them.  Students place the shirt on the file folder rack to let the dye drip through and your in business!  After both sides are done and the excess dye has dripped off, put it back in your ziplock bag and let it sit.  This  is the most important part--if you don't let the dye set for at least 24 hrs the colors won't be very vibrant.  I didn't trust the kids to wash them at home so I just did that part, before I put them in the wash machine I hose them off to get any extra dye out. 


Step 5: Wearing Them
Beware: kids will wear their shirts for the next 5 days straight--I PROMISE.  But before they took them home I obviously made all 60 students wear them and parade around school in a line with my Tie Dye posse.  Needless to say everyone who wasn't us was jealous.  


Thursday, July 9, 2015

Art in Motion: Digital Flipbooks

This year my summer school class (comprised of 5th and 6th graders) tackled the theme of Art in Motion.  Who better to learn about this concept other than Eadward Muybridge??!  Now, I will admit I did have dreams of galloping horses and walking ostriches, but that's besides the point.  This video did a really great job of introducing the artist to the students.  I know there are a few portions in the video with the naked photography, so I just youtube Chopped them out and played the video in segments.  

 photo anigif_enhanced-buzz-25928-1350398814-14_zps9x85q819.gif

We discussed the groundbreaking stuff that Muybridge was able to capture through still photography and pretty much invented what we know as the modern day gif (and that ladies and gentlemen is where they were hooked).  Unfortunately, we ran out of time before we could dive into the creation of our own gifs; instead, we explored the world of the digital flipbook.  To create the drawings students used the website BennetonPlay!  This is a free website, no log ins required.  With the limited edition students are able to create a 100 frame digital flipbook.  I LOVED these, my students LOVED them--the world was happy.  We only had about thirty minutes slotted to use the computer lab, so most of this digital drawings only took about thirty minutes.  But, the best thing (and you know you've done something right when this happens) the kids would go home after school and create MORE on the website and email me the link to their creations.  Pretty awesome stuff right there.

WARNING: DON'T LOOK AT THESE ALL AT ONCE YOU MIGHT GET MOTION SICKNESS


I hope you continue to enjoy your summer.  I know I certainly have been--I've been pretty unplugged this summer just because you know I got to get out and enjoy that Nebraska sun!  

I will be presenting at the AOE Online Summer Conference.  If you haven't signed up yet, you should-- you still have a couple days to do so!  I'll see you there!


post signature

Sunday, April 19, 2015

What Did You Problem Solve Today? --Ponytail Crisis of 2015

When I was in college going through my art methods courses, I felt like I was programmed to believe that we teach art to promote critical thinking and problem solving skills.  I was kind of at the point where this just became my automated response--it sounded good, but recently I've really been reflecting on what it really means.  

It all started a few weeks ago.  I was on mile 6 of 8 on my run and all of a sudden I could feel my long, blonde locks blowing in the wind as I was gracefully striding down the trail.  Okay fine, I was panting for breath, probably wheezing, and could feel my hair plastered to my forehead and neck.  My ponytail fell out AND WAS NOWHERE TO BE FOUND.  I had a slight moment of panic...because guys, I have A LOT of hair.  I stopped, circled around like a dog chasing his tail, looking for SOMETHING to help me out.  Luckily, we've had some crazy rains and that grass is growing green and strong. I started picking out the best pieces of grass I could find, tied 4 of them together, tied it around my hair, and voila--makeshift ponytail.  I survived the last two miles, it was weird, but survival nonetheless.  As I finished the run, listening to the Beach Boys Greatest Hits, I thought to myself--that's problem solving, yo. 


How many times do we see our students do something like this in class?  I see it all the time without even realizing it.  Whether it's using their reasoning skills to mix a color they've never created before or discovering why watercolors and crayons don't mix--problem solving and critical thinking are REALLY happening. Pretty rad, right?


What does this have to do with the lesson's I am sharing? Absolutely nothing.

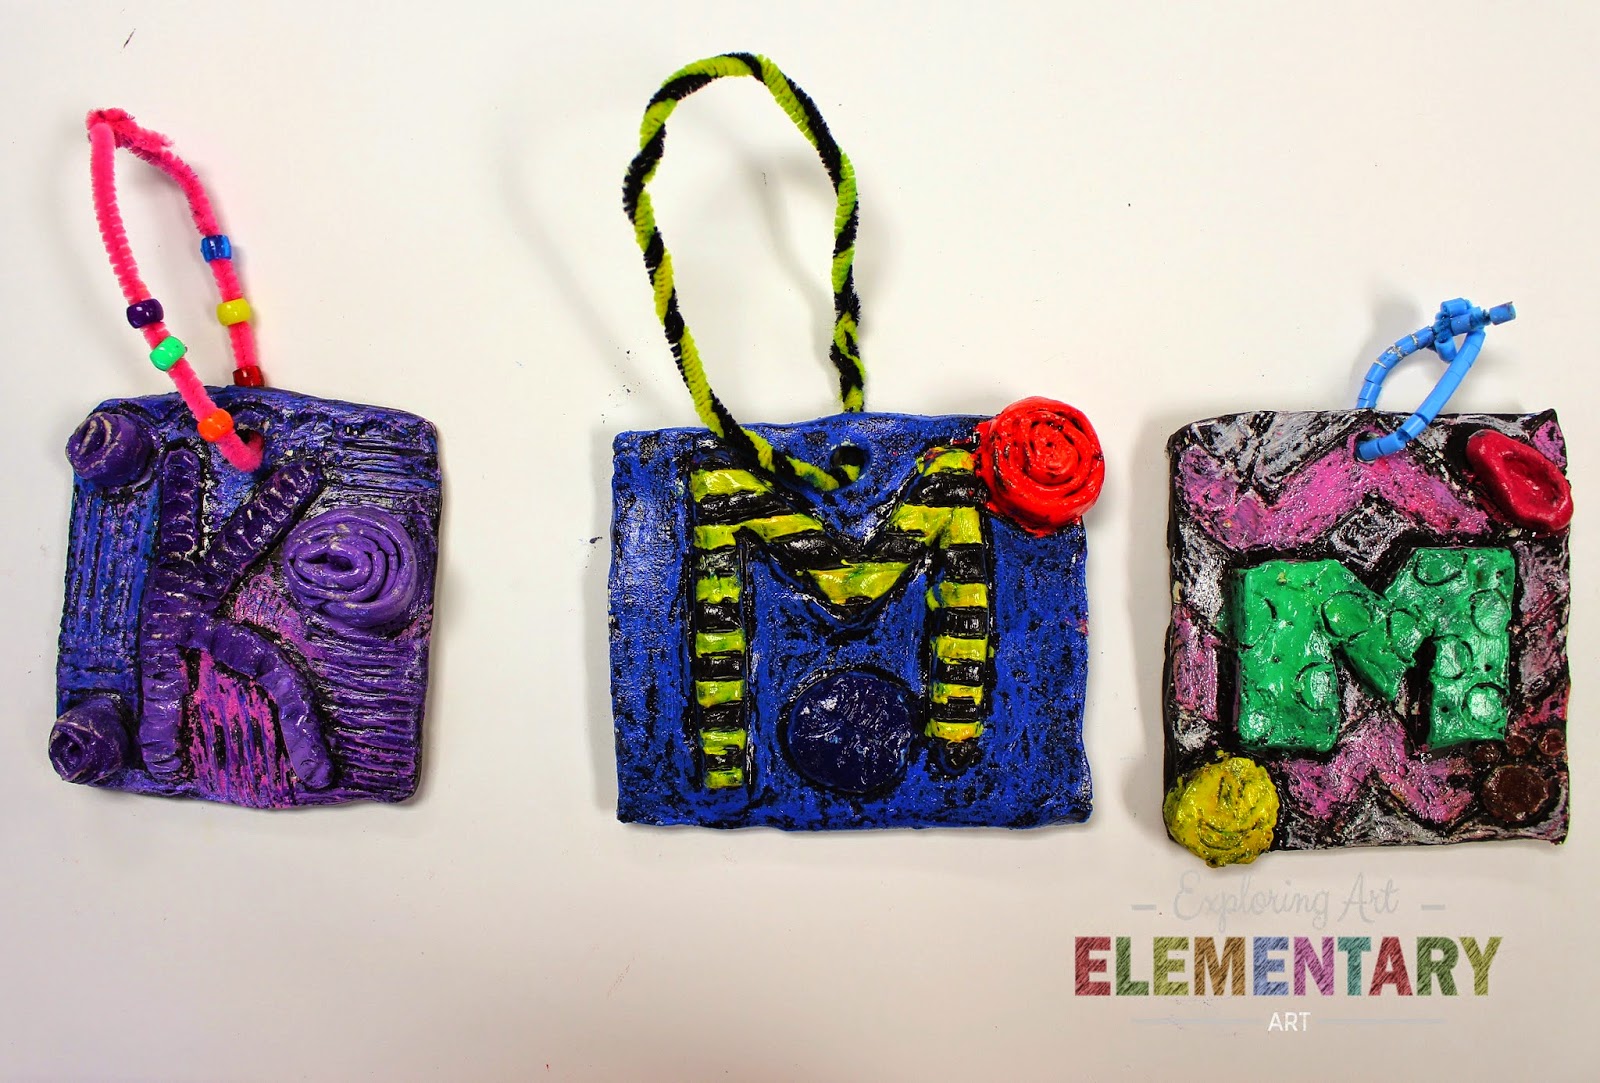
So please do enjoy the work of these fabulous 5th graders, as we took the time to explore the differences in form using 2D and 3D materials. The drawing lesson was very similar to this one here.  The clay tiles took a more personal look at each student, as they created a piece "about me."

***Note to self: When photographing clay initials pay attention to what words you are spelling...I certainly didn't my first go 'round. ***   

What does problem solving and critical thinking look like in your classroom?
post signature

Monday, March 23, 2015

Minion Self Portraits--The Best Sub Plan EVER!

In my three years of teaching I'm yet to have a sick day (now that I've written that I will probably be bound to my bed with some sort of ailment tomorrow or next week during Spring Break).  Sure, I've had subs, but conveniently for me I've always been able to plan out lessons in advance.  As all teachers know--SUB PLANS WILL BE THE DEATH OF YOU.  When I start to write them I always ask myself, "Do I really have to be gone, this is just too much work!"  And then I have to think about "will my sub actually be an 'art' person?" Not knowing this I don't always want to continue on with our projects because you know...I don't want them to be destroyed!  Ye of little faith, I suppose.

Anywho, I try to simplify it as best I can for the sanity of the sub and myself.  This lesson here was awesome.  I was doing mono printing with 4th and 5th graders and no way was I about to continue that with a sub (my head hurts just thinking about it).  The only resource they used was this handout to draw, otherwise the rest was up to them.  


My favorite resource to inspire sub lessons is Art for Kids Hub.  The "how to" drawing instructions ROCK, plus the videos are pretty cool too.  We all know how I feel about erasers and the drawing how to's don't even require erasing lines!  

What are some of your go to resources when planning for a sub?


post signature