Tuesday, November 19, 2013

Kindergarten Ladybug Pinch Pots


Kindergartners started this lesson by talking about shape vs form. 


We then read "The Grouchy Ladybug" by Eric Carle.

Step by step, using air dry clay students first made a pinch pot, they added a head, and poked in eyes with the back of a pencil.  They then divided the pinch pot with a line to make the wings and by rolling small balls and flattening them on the ladybugs body they made spots. I poked in holes and glued in pipe cleaners for antennas.  

To see last years ladybug post click here.  


To add color students used a black and red oil pastel.  They then used a mixture of watered down tempera paint to get any remaining white spaces.  They were topped off with a coat of clear acrylic.  


Thursday, November 14, 2013

1st Grade Leaves and leaf rubbings

For this project 1st graders were given a leaf. There were asked to enlarge their leaf and have it fill the page.  Then using yellow, orange, red, and brown oil pastels students practiced blending colors to fill in the leaf.  Then students used crayons to do leaf rubbings around the outside (some of them are hard to see in the pictures). Students finished by outlining their leaf with a black oil pastel.


Tuesday, November 12, 2013

4th grade Patterned Pumpkins

This was a quick two day lesson that the students loved! I was inspired by this project.  We drew our pumpkins all together.  I then passed out a packet filled with patterns, students were instructed to create a different pattern on each section of their pumpkin.  We then finished off with watercolors.  Here are some of the results.

Friday, November 8, 2013

Leaping Lizards or Crawling Chameleons


Third graders explored color mixing and how to make intermediate colors. This was a three day lesson. On day one students painted paper using one primary color and one secondary color to create and intermediate color. Using different rollers and scrapers students were able to give texture to the paper. I had one class paint one side of the paper and another class painted the other side so we wouldn't have white paper showing on our sculpture. 

We watched this video which really got they students pumped!


On the second day we made the bodies and added legs. On day three students made heads, eyes, and tongue.  We followed these step by step instructions. 


Tuesday, November 5, 2013

2nd Grade Warm/Cool Color Leaves

Students explored warm and cool colors. For this lesson students went outside and found a leaf.  We came back inside and drew our leaf on a 5in square, students were instructed to have their drawing touch all four sides of the paper.  We then cut it out for a stencil and traced on a white piece of drawing paper 3-4 times (depending on how big the leaf was).  When tracing leaves students were instructed to not have leaves overlap or touch.

We then discussed warm and cool colors. Students were to choose if they were using warm or cool colors to fill in their leaves.  We did this step with crayons leaving no white spaces students could create patterns and designs in all of the leaves.  I did not make them repeat patterns if they didn't want to. 

To fill in the background students used the colors they did not use on the leaves.  Each class filled the background using different materials either using markers, crayons, or liquid watercolors.

Here are some of the results, I think it's a nice twist on a typical fall project!


Thursday, October 31, 2013

5th Grade Lego Self Portraits

5th graders created these AWESOME LEGO self portraits.  The inspiration for this lesson came from a fellow art teacher.  Students started by drawing the basic lego shape thinking of the head as a rounded square, the body as a trapezoid, the legs as rectangles, and the arms as a pentagon cut in half.  After students mastered the lego form they were to go in and make it look like them. We experimented with shade and value to help bring our legos to life.

They ALL turned out so well I'm excited to share them! 


Here are just a handful of the fabulous drawings created!


Wednesday, October 30, 2013

1st Grade Pumpkin Patch

1st graders made these fabulous pumpkins! We did a quick drawing with sharpie markers (no erasing) and colored in with oil pastels.  We started off with a yellow-orange, then orange, and red-orange making sure to blend and overlap the colors together.  Students used green first then brown on the stem.    Students then used a light green for the grass and went over with a dark green for the shadow.  To finish off the sky students first used a blue-violet and then went over with a light blue.
They all turned out so awesome!

Tuesday, October 29, 2013

Kindergarten Primary/Secondary Color Scarecrows

Kindergarteners explored mixing the primary colors to create the secondary colors in this project.
I had the parts of the scarecrow traced out on 3 pieces of paper. Students painted with the primary colors to make the secondary colors.


1st Grade Primary/Secondary Color Zebras

1st graders reviewed primary and secondary colors.  Through a directed drawing we drew our Zebra's together.  Using chalk students colored in the zebra using the secondary colors and used primary colors for the background.
Teacher Example


Kindergarten Secondary Color pumpkins

With all the painted paper kindergarteners made students made a fall inspired piece.  Using the secondary color painted paper students practiced our cutting and gluing skills as well as making shapes.  The main shape we focused on was the pumpkin shape using an oval to make the form.  Students could add detail to their pumpkins with black sharpie.


Friday, October 11, 2013

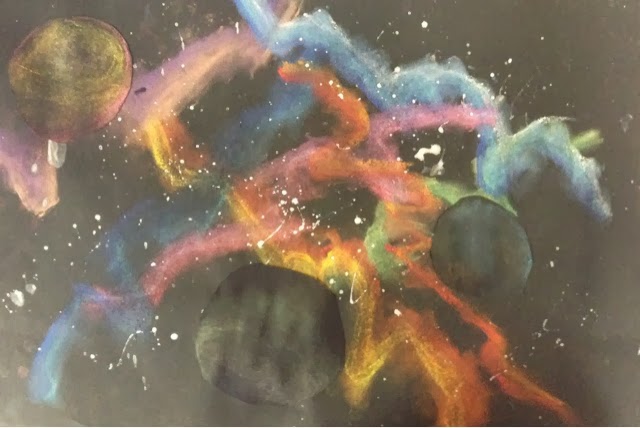
4th Grade Galaxies

4th graders are studying space and the Solar System in science.  To go along with that I decided to do a space themed project. Using chalk and black paper students created their own galaxy.  We explored this website to help give us some ideas as to what our galaxy might look like. On day one of the project students created a stencil to use as an outline for the chalk on the background.  


After students had filled the page and blended the chalk.  Students were able to add some stars by using watered down silver tempera paint and doing a little splatter paint.

On the second day of the project we discussed form and asymmetrical balance.  Students then created planets with chalk on black paper that they cut out and had to arrange them using asymmetrical balance.

Here are some of the results, they are all turning out so well!


Only two students out of 125 4th graders added rings to their planets.